That joyous time of year again. The time of year where everyone declares what they are going to do in the New Year better than they did the year (or years before). For some it is motivation, but to me the changing of the year only means one thing…I will write the date wrong on everything for a month. ![]()
I thought about doing a Best of 2010 like a lot of bloggers do, but quite honestly, I am all about looking forward to the future rather than looking back into the past. Certainly we can learn a lot by looking at our past, but dwelling on it can be a bad idea. Reading many of my friends resolutions so many of them are ridiculous ones like “get back to the size I was in high school”. First off that does me no good, as I was no petite flower back then either. And second it also doesn’t help you be happy with the current you. And if you aren’t happy no one around you is either. So forget about squeezing into your old jeans and just buy more handbags and necklaces. Accessories will fit you no matter what your size (rings sometimes don’t qualify, but with the right amount of lotion you can make it fit).
Me, I’m not dwelling on anything. I’m not making a list of all the things I am going to do in 2011. I will tell you the things I’m NOT going to do (or at least that’s the plan).
1. Pose naked. I’m sure you can rest easier knowing that (sorry F)
2. Watch the Jersey Shore.
3. Go cow tipping.
4. Call up the owner of the Philadelphia Eagles to praise the team for giving a second chance to Michael Vick.
5. Explore the world of glitter eye shadow.
6. Be drafted by the NHL.
7. Tell people how many calories something is while they are eating it.
8. Become a famous athlete and send photos of my private parts to people….I will only do that when I am not a famous athlete. ![]()
9. Give up eating ice cream just because I am allergic to dairy…that’s what the pills are for right?
10. Be featured on the People of Wal-Mart website.
What about you? What will you NOT be doing in 2011?
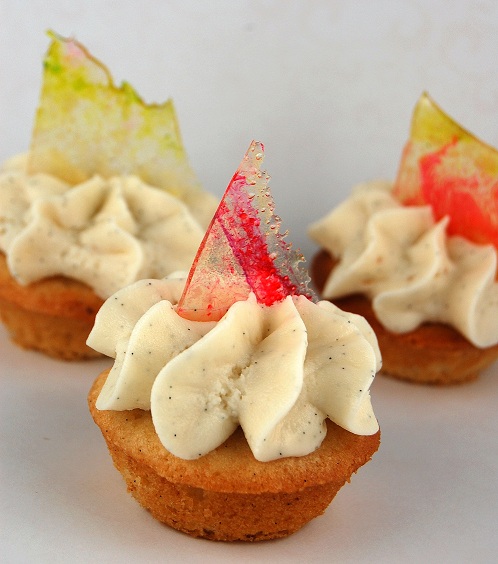
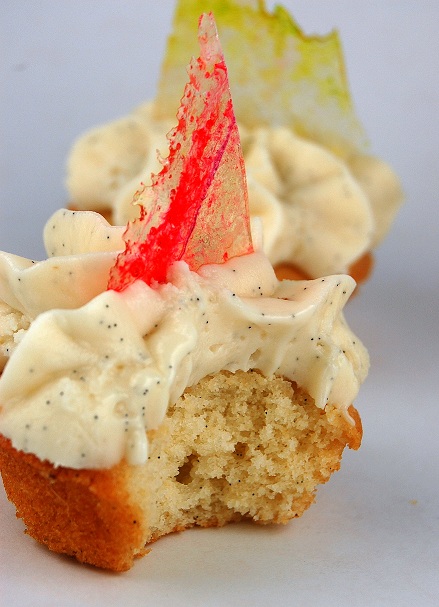
So in honor of just buying more accessories, I accessorized my cupcakes a little. I originally just wanted a vanilla malted cupcake (mini of course so you can eat more of them). But they seemed so plain for a New Year’s treat. I have been obsessed with malted milk powder as of late. It’s hard to find so when I do, I stock up on it. Mine is made by Carnation (hey Carnation, want to send me free Malted Milk Powder…please do!). I love the flavor it gives. But then again I think Whoppers should be its own food group. I even added it to my sugar cookies this year for Christmas.
The stained glass candy is something from my pastry school days. But it’s not that hard, you just have to catch the sugar before it turns a caramel color. Helen over at Tartlette did some really pretty stained glass caramel awhile back and you can see hers, here.
I hope everyone has a safe and happy New Year’s Eve. I am staying in. Me and the pup. Probably some bubbly I have been saving and some cheesy John Hughes movies. Have to be up on New Year’s Day to watch the Winter Classic. ![]()
Cheers my friends and see you in the year 2011!

Malted Vanilla Bean Mini Cupcakes with Stained Glass Candy
Malted Vanilla Bean Mini Cupcakes:
1 ½ cups self-rising flour
1 ¼ cups all-purpose flour
½ cup malted milk powder (Carnation makes this…if you can’t find you can use Ovaltine but that will give it a chocolate flavor that the regular malted milk does not)
1 cup (2 sticks) unsalted butter, at room temperature
2 cups granulated sugar (preferably superfine)
4 large eggs, at room temperature
1 cup whole milk
2 vanilla beans, beans scraped and pods discarded
Preheat oven to 350 degrees F.
Line two 24 cup mini muffin tins with cupcake papers or spray with baking spray.
In a small bowl, combine the flours and malt powder. Set aside.
In a large bowl, on the medium speed of an electric mixer, cream the butter until smooth.
Add the sugar and gradually and beat until fluffy, about 3 minutes.
Add the eggs, 1 at a time, beating well after each addition.
In a medium bowl whisk together the vanilla beans and milk.
Add the dry ingredients in 3 parts, alternating with the vanilla bean milk. With each addition, beat until the ingredients are incorporated but do not over beat.
Using a rubber spatula, scrape down the batter in the bowl to make sure the ingredients are well blended. Carefully spoon the batter into the cupcake liners, filling them about 3/4 full. Bake for 13-15 minutes, or until a cake tester inserted into the center of the cupcake comes out clean.
Cool the cupcakes in tins for 10 minutes. Remove from the tins and cool completely on a wire rack before frosting.
Malted Vanilla Bean Buttercream Frosting:
1 cup (2 sticks) unsalted butter, at room temperature
6 to 8 cups confectioners’ sugar
1/2 cup milk
1/3 cup malted milk powder
2 vanilla beans, beans scraped and pods discarded
Place the butter in a large mixing bowl. Add 4 cups of the sugar and malted milk powder.
Then the milk and vanilla beans.
On the medium speed of an electric mixer, beat until smooth and creamy, about 3 to 5 minutes. Gradually add the remaining sugar, 1 cup at a time, beating well after each addition (about 2 minutes), until the icing is thick enough to be of good spreading consistency.
You may not need to add all of the sugar. If desired, add a few drops of food coloring and mix thoroughly. (Use and store the icing at room temperature because icing will set if chilled.) Icing can be stored in an airtight container for up to 3 days.
Cupcake recipe adapted from The Magnolia Bakery Cookbook: Old-Fashioned Recipes From New York’s Sweetest Bakery by Jennifer Appel and Allysa Torey
Stained Glass Caramel
1 cup granulate sugar
2 1/2 TBSP water
Various food colorings
Line a baking sheet with parchment paper. Drop a few drops of food coloring onto the paper. Do not touch them, swirl them or move them.
In a heavy saucepan, combine the sugar and water, do not stir and bring to a boil over high heat. Continue to boil until the caramel reaches the soft crack stage or 140C – 285F on a candy thermometer (do not let it turn color). Immediately pour over the parchment paper with the food coloring.
Take the baking sheet with your hands and move it left to right, right to left to move and swirl the colors. Let set until completely cooled. Break pieces of your desired size to decorate the cakes with.
Candy recipe from Tartlette.com
Tidak ada komentar:
Posting Komentar