Minggu, 06 Februari 2011

Calculating a Budget for an Agile Project in Six Easy Steps

A former student of mine called the other day. He asked a good question: how do you calculate the budget for a project if you are using an agile approach to delivery. Here is the overview of the six steps to do this. I will follow the overview with some detailed comments.

  1. Prepare and estimate the project requirements using Planning Poker

  2. Determine the team’s Velocity

  3. Using the team’s burn rate and velocity calculate the budget for the Iterations

  4. Add any capital costs

  5. Using the definition of “done” add pre- and post- Iteration budgets

  6. Apply a drag or fudge or risk factor to the overall estimate


Prepare and estimate the project requirements using Planning Poker


The project requirements have to be listed out in some order and then estimated. If you are using Scrum as your agile approach, you will be creating a Product Backlog. Extreme Programming and you will be creating user stories. OpenAgile and you will be creating Value Drivers. Kanban and you will have a backlog of work in progress. Regardless of the agile approach you are using, in a project context you can estimate the work using the Planning Poker game. Once you have your list, you need to get the team of people who will be working on the list to do the estimation. Estimation for agile methods cannot be done by someone not on the team – this is considered invalid. It’s like asking your work buddy to estimate how much time it will take to clean your own house and then telling your kids that they have to do it in that amount of time. In other words, it’s unfair. Planning Poker results in scores being assigned to each item of your list. Those scores are not yet attached to time – they simply represent the relative effort of each of the items. To connect the scores to time, we move to the next step…


Determine the team’s Velocity


The team needs to select its cycle (sprint, iteration) length. For software projects, this is usually one or two weeks, and more rarely three or four weeks. In other industries it may be substantially different. I have seen cycles as short as 12 hours (24/7 mining environment) and as long as 3 months (volunteer community organization). Once the duration of the cycle is determined, the team can use a simple method to estimate how much work they will accomplish in a cycle. Looking at the list of work to be done, the team starts at the top item and gradually working their way down, decide what can fit (cumulatively) into their very first cycle. Verbally, the conversation will go something like this:


“Can we all agree that we can fit the first item into our first cycle?”


- everyone responds “Yes”


“Let’s look at the second item. Can we do the first item AND the second item in our first cycle?”


- a little discussion about what it might take to do the second item, and then everyone responds “Yes”


“Okay. What about adding the third item?”


- more discussion, some initial concern, and finally everyone agrees that it too can fit


“How about adding the fourth item?”


- much more concern, with one individually clearly stating “I don’t think we can add it.”


“Okay. Let’s stop with just the first three.”


Those items chosen in this way represent a certain number of points (you add up the scores from the Planning Poker game). The number of points that the team thinks it can do in a cycle is referred to as its “Planning Velocity” or just “Velocity”. With the velocity, we can then do one of the most important calculations in doing a budget…


Using the team’s burn rate and velocity calculate the budget for the Iterations


The team’s velocity is a proxy for how much work the team will get done in a cycle. However, in order to understand a budget for the overall project, we need to take that estimate of the team’s output and divide it into the total amount of work. Our list has scores on all the items. Sum up the scores, then divide by the velocity to give you the number of cycles of work the team will need to complete the list. For example, if after doing Planning Poker, the sum total of all the scores on all the items is 1000, and the team’s velocity is 50, then 1000 ÷ 50 = 20… This is the time budget for the team’s work to deliver these items. To do dollar budgeting, you also need to know the team’s burn rate: how much does it cost to run the team for a cycle. This is usually calculated based on the fully-loaded cost of a full-time-employee and you can often get this number from someone in finance or from a manager (sometimes you can figure it out from publicly available financial data). In general, for knowledge workers, the fully-loaded cost of a full time employee is in the range of $100000/yr to $150000/yr. Convert that to a per-cycle, per-person cost (e.g. $120000/yr ÷ 52 weeks/year x 2 weeks/cycle = $4615/person/cycle) and then multiply by the number of people on the team (e.g. $4615 x 7 people = $32305/cycle). Finally, multiply the per-cycle cost by the number of cycles (e.g. $32305 x 20 cycles = $646100).


This is the budget for the part of the project done in the cycles by the agile team. But of course, there are also other costs to be accounted.


Add any capital costs


Not many projects are solely labor costs. Equipment purchases, supplies, tools, or larger items such as infrastructure, land or vehicles may all be required for your project. Most agile methods do not provide specific guidance on how to account for these items since agile methods stem from software development where these costs tend to be minimal relative to labor costs. However, as a Project Manager making a budget estimate, you need to check with the team (after the Planning Poker game) to determine if they know of any large purchases required for the completion of the project. Be clear to them what you mean by “large” – in an agile environment, this is anything that has a cost similar to or more than the labor cost of a cycle (remember: agile projects should last at least several cycles so this is a relatively small percentage of the labor costs). In the previous example calculation, the cost per cycle was $32305 so you might ask them about any purchases that will be $30k or larger. Add these to the project budget.


Using the definition of “done” add pre- and post- Iteration budgets


Every agile team is supposed to be “cross-functional” but in reality, there are limits to this. For example, in most software project environments, teams do not include full-time lawyers. This limited cross-functionality determines what the team is capable of delivering in each cycle – anything outside the team’s expertise is usually done as either pre-work or after the iterations (cycles) are finished. Sometimes, this work can be done concurrently with the team. In order to understand this work, it is often valuable to draw an organization-wide value stream map for project delivery. This map will show you the proportion of time spent for each type of work in the project. Subtract out all the work that will be done inside the agile team (their definition of “done”) and you are left with a proportion of work that must be done outside the agile team. Based on the proportions found in the value stream map, add an appropriate amount of budget based on the project’s cycle labor costs.


Apply a drag or fudge or risk factor to the overall estimate


And of course, to come up with a final estimate, add some amount based on risk or uncertainty (never subtract!) Generally speaking, before this step, your project budget is going to be +/- 20%-50% depending on how much you have used this approach in the past. If you are familiar with it and have used it on a few projects, your team will be much better at understanding their initial velocity which is the foundation for much of the remaining budget estimates. On the other hand, if you are using this method for the first time, there is a high degree of anxiety and uncertainty around the estimation process. Please feel free to add a buffer that you feel is appropriate. But again, never, ever, ever remove time or money from the budget at this last step.


Please let me know if you have any comments on how you have done this – tips, tricks or techniques are always welcome in the comments.

Announcing the Adobe TV Community Translation project

Adobe has just launched an innovative project, Adobe TV Community Translation. The project, as described on the Adobe TV site, extends the reach of Adobe TV content by enabling volunteer translators worldwide to translate videos into any language.
Community Translation project

Community Translation project


Participants in the program use a simple, intuitive interface provided by our partner dotSUB to translate the closed-captioning titles line-by-line. The translation becomes available as a closed-captioning track on the video, and also appears as a searchable, interactive transcript alongside the video.


The Community Translation page on the Adobe TV site has detailed information about the project, including translator resources such as guidelines and FAQ. For your quick understanding, here are some excerpts from the FAQ.


Who can translate for Adobe TV?


Anyone with fluency in English and at least one other language can apply to be a translator. To apply to be a translator, visit the Become a Translator page and fill out the questionnaire. Once you are approved, you will receive instructions on how to set up an account with our technology partner dotSUB. You will perform all your translations through dotSUB’s website.


Will you get paid to translate Adobe TV content?


Adobe TV translators are volunteers, so there is no payment for completing translations. For every minute of video you translate, you will earn 50 Adobe TV points. Translators with at least 2,000 Adobe TV points get their profile featured in the Translator Showcase, which will launch soon.


How much time do you get to complete your translation?


When you choose a video to translate, you will have 30 days to complete the translation.


When I finish my translation, will it automatically be posted?


All translated episodes go through a review process before they can be posted to the site.


So if you’re aware that an audience in a language that you know can benefit from translated videos, sign up and get going. There have already been 154 translations completed, in 25 different languages. A list of translated videos is available at http://tv.adobe.com/translations/watch

optimizing for performance: Adobe Premiere Pro and After Effects

A few days ago, we hosted a one-hour session about optimizing for performance of both Adobe Premiere Pro and After Effects. In case you missed it, here’s the recording.

We also said that we’d post a set of links for more information about all of the things that we covered. It was a very fast-paced session—or maybe it just felt that way to me, since I was the one doing most of the talking—and we covered a lot of ground. Now you can follow the links below at your own pace to get (a lot) more details.


If you have any questions, please bring them to the After Effects forum or the Premiere Pro forum. It’s much harder to have a conversation in the comments of a blog post than on the forum.


(By the way, be sure to install the recent updates. There are a lot of fixes and performance improvements in the recent updates.)


The most comprehensive place to find information on improving performance in After Effects is the “Improving performance” page in After Effects Help. Much of what is listed above can also be found there, plus much more.


One of the questions that went by, that I didn’t see until reviewing the recording, was about ducking audio. See this page for a suggested method; just look for ‘Nathan Gambles’ on that page.


During the Q&A session, Al Mooney told John R. Moore that he’d get in touch after the session, but it turns out that we don’t have John’s contact information. John, if you’re reading this, please leave a comment and let us know how to contact you.

Getting Started with Adobe Premiere Pro from Video2Brain


Video2Brain has recently released a new training workshop aimed at folks just beginning with Premiere Pro, Getting Started with Adobe Premiere Pro CS5.


Maxim Jago did a great job (with Jan Ozer) creating the comprehensive Adobe Premiere Pro CS5: Learn By Video training DVD and book, as well as Premiere Pro CS5 for Avid Editors. It’s good to see him back with this series on the basics.


Here are a few free sample video tutorials from this workshop:


Video2Brain has been quite busy lately, putting out several DVDs and online training series about Adobe professional video applications. Other notable recent releases include After Effects CS5: Learn By Video and the free After Effects CS5: Frequently Asked Questions.


For additional, free getting-started resource for Premiere Pro, see “Getting started and Help pages in several languages”.

Quick Reference Guides: Captivate and Connect

We’ve just produced a new Captivate Quick Reference Guide to accompany the one for Connect. Captivate is hugely popular with customers that already use it and there is a site with product information and customer testimonials:

http://www.adobe.com/education/products/captivate/


Here’s the Captivate 5 Quick Reference Guide to help sell into Education customers


Adobe_QRG_Captivate5_Final


In addition here’s a reminder of the Connect QRG and a link to the web site for Education specific information:


Connect Edu Quick Ref Guide


http://www.adobe.com/education/products/adobeconnect.html


Finally, there’s education specific information on Creative Suite and Acrobat X. Here are the two web links:


CS5 = http://www.adobe.com/education/products/creativesuite/


Acrobat X = http://www.adobe.com/education/products/acrobatpro/

PixelFlow : EaselJS / Canvas Dynamic Graphics Example


If you have happen to have been watching my Flickr feed for the past week or two, you have probably noticed that I have been playing around with creating some graphics using Canvas and EaselJS. What started as a simple EaselJS experiment, quickly morphed into an excuse to build a mini app / example and play around with some of the new HTML5 and CSS3 features.


PixelFlow


The example I created (named PixelFlow) is a simple example / app that allows you to choose an image, and then create some designs using the colors from the image. The core drawing functionality is built about the HTML5 canvas element and the EaselJS library. It also leverages CSS3 transitions and transformation for animating the UI elements (loading and unloading).


You can play around with the example yourself at:


mikechambers.com/html5/easeljs/PixelFlow/


I built the example with touch in mind, and thus it has support for touch on Android and iOS devices. Of course, it also works on the desktop using mouse input.


Here is a video showing the example in action:


As you can see, the multitouch works really well on the iPad.


Huge thanks to Ben Griffith who saved me (and you) from my horrid design skills, and put together a great design for the example.


You can download all of the code from my GitHub repository (released under an MIT License). The code is completely commented, and should be pretty easy to follow.


The example uses the Canvas.toDataURL API to allow you to save and download your creations as a PNG. If you create anything cool, please post a link in the comments.


I have tested the example on the following browsers, all of which should work:


  • iPad / iPhone iOS 4

  • Android 2.2.2 (Nexus One and Galaxy Tab)

  • Firefox 4 on Mac and Windows

  • Google Chrome on Mac and Windows

  • Apple Safari on Mac and Windows


The example wont work on:


  • Firefox 3.6 (doesn’t support CSS Transitions)

  • Internet Explorer 8 and below (doesn’t support Canvas)

  • Internet Explorer 9 (doesn’t support CSS Transitions)


I could have made changes so IE 9 would work (by removing the reliance on the transitions), but as this was an example to use off some of these features, I decided not to.


There are a couple of known issues:


  • You can not save images on Android based devices, as they do not support the Canvas.toDataURL API.

  • Rendering is aliased while drawing on Android devices (which looks crappy).Once you stop drawing, everything looks fine.

  • Touch does not work on Firefox 4 devices, even if you are on a touch device. I haven’t had a chance to implement the Firefox touch api yet as I haven’t had a touch device with Firefox to test on.


Below are some of the things that I learned while working on this:


Touch support and APIs vary greatly between browsers


Initially the app was mouse based, but I knew that I wanted to enable multitouch for it (at least on the iPad). While it took me some time to find solid docs on the iOS JavaScript multitouch API, once I figured it out I was really surprised by how solid and well designed it was. Indeed, the W3C just released a draft multitouch specification which is based (or inspired by) the iOS API.


Since Safari on iOS is webkit based, I (naively?) expected that the same API would be present on Android based devices. However, I quickly discovered that while the API on Android is similar, it has nowhere near the level of implementation / quality as on iOS. For starters, while the API on Android is multitouch, the browser only supports a single touch point. Worse, if there are multiple touch points, you start getting some weird behavior (i.e. all touchmove events stop broadcasting).


This was frustrating, but I ended up settling on a single touch experience for Android devices (which still works pretty well).


I then realized that the Firefox 4 beta also had support for touch (at least on Windows 7). I didn’t have access to a touch screen on Windows to test though, so I was not able to implement it. However, the Firefox touch API is significantly different than the iOS / Android APIs, and while it looks pretty straight forward, will require some additional detection and code paths in my code to deal with it (adding more complexity).


In general, I don’t think touch support in the browser is there yet. If you can limit your content to just iOS devices, then you can create a very good experience that is relatively easy to develop. However, as soon as you start to support other devices, the complexity and issues dramatically rise.


Canvas Implementations seem pretty solid


With one exception, working with Canvas was pretty painless. I didn’t run into any cross browser issues (although some of those may have been handled by EaselJS) while working with it.


I architected the drawing in my app in a way that performance shouldn’t be a major issue, and it runs fine on both desktop and devices. However, I did have performance issues on the iPad when I added a second overlay canvas, and had to end up removing it when running on touch devices.


I did have a minor hiccup when I realized that when exporting an image from the canvas using canvas.toDataURL, there is no background color. However, after some research into the Canvas API, I was able to work around this in a pretty generic way..


The one major issue I did run into with Canvas was that I discovered that the toDataURL API is not implemented on Android. Because of this, I had to remove the ability to save designs when running on Android. (Apparently this issue is fixed in the Android Honeycomb release).


Of course, Canvas is not supported in any release version of Internet Explorer, but aside from that (and it is a big aside), it worked really well everywhere I tested it.


CSS Transitions Rock


When you run the example, you will notice that UI elements slide in and out as a transition between views. Initially I was using JavaScript to tween the CSS position properties. This worked fine on the desktop, but was noticeably laggy when running on a device.


I then switched the transitions to use CSS3 Transitions and Transforms which are hardware accelerated on iOS. Frankly, I was blown away by how well they performed (see the video above).


In general, working with the transitions was really easy. I trigger them from JavaScript, and then in some cases, listen for the event when they are done. The biggest issue that I had was that in a couple of instances I needed to chain a number of transitions together which was a bit cumbersome.


Of course, once I tested in other browsers, some complexity was added. In particular, Firefox has different names for the relevant properties and events. They work the same, but it did add some complexity to my code.


Everything that I read online said that in order for the CSS transitions to be hardware accelerated on iOS, you had to explicitly use the transform3d style. However, Apple seems to have updated the browser, as I found that the 2d transform was also accelerated.


Finally, CSS3 transitions work really well if you need to move something and then forget about it until it is done. It doesn’t seem quite as useful though for something like a game, where an item may have to change its trajectory, or other properties while moving.


I did run into an iOS issue where if I referenced an Image element right before it was included in a transition, it would cause the drawing to completely flake out. Once I figured it out, it was easy enough to work around, but, given how new some of this stuff is, you should expect to hit odd issues like this every now and then.


Stability / Quality


In general, I didn’t really run into any major cross browser problems until I began to use some of the new features and APIs. This is to be expected, as some of this stuff is pretty cutting edge, but it is something to keep in mind, especially if you have gotten used to not worrying about cross browser issues because of the maturity of a lot of the JavaScript libraries.


I really like EaselJS


I used the EaselJS library to handle the drawing and canvas management for me, and it worked out really well. It abstracted away a lot of the lower level details of working with the canvas, and allowed me to focus on just creating something neat / fun.


It’s API is similar to the DisplayList API in Flash, which really helped me understand how to model everything.


In addition, I was able to contribute some of the code that I developed for this example, back to EaselJS, which will be included in the next release.


CSS Media Queries really work!


I initially was developing and testing on the desktop and on the iPad. Once I implemented the updated design from Ben, I discovered that it was completely unusable on smaller screens (iPhone and Nexus One). However, in about an hour, I was able to implement a new, small screen style sheet using CSS media queries, and my problem was solved.


It did require a couple of minor changes to the structure of the HTML, but in general, I was surprised by how easy it was to implement / tweak the design for smaller screens.


The more complex the app became, the more cross browser / platform issues I ran into


I know this is a “no duh!” point, but I think it is important enough to reiterate. It is very easy to build something cool just targeting one browser. However, you will run into issues when you start testing across browser, and those issues will multiply the more complex your content is.


In addition, a lot of the new features are not supported / abstracted away by JavaScript libraries yet, so expect a lot of lower level API implementations when using newer features and APIs (such as touch).


Once some of the implementations settle down, there is an opportunity for existing or new libraries to make this stuff easier, especially around touch and CSS transitions.


Use only as much library as you need


When I first started the project, I was using jQuery as the main DOM library for the app. However, I soon realized that jQuery is pretty large and that I wasn’t using any of the jQuery UI elements. I was particularly concerned about size, as I wanted the example to run well on devices (and load quickly).


I searched around, and ended up settling on xui, which is similar to jQuery. xui, which was built for use in PhoneGap, doesn’t try to do as much as jQuery, and has a strong focus on mobile (where the browser landscape is a bit less varied). Because of this, it is much smaller (around 8kb). It has worked great, although there have been one or two things which jQuery provided that XUI didn’t.


If I needed more UI controls, then I would probably switch back to jQuery, but for this example, xui was perfect.


Performance isn’t just about performance


One final note about performance. A couple of people that I have showed this to have commented that it feels a little slow, especially on the ipad. It is actually running full speed, but I have the graphics draw at a constant rate. This way, it creates nice and smooth lines and color shifts. On the desktop I have added a graphic which shows what the shape is doing, and where it is going. This makes it much clearer what is going on, and seems to shift the perceptions around performance. However, I wasn’t able to add the overlay graphic on the iPad because the second canvas did affect negatively performance. Without the overlay though, the example runs at full speed, but there is a perception that it is running slow.


I think this demonstrates how important UI feedback and responsiveness are important to perceptions around performance. Being able to provide better feedback / UI to the user which indicates what is going on can help improve perceptions around performance.


Anyways, I had a lot of fun working on it, although I am ready to work on some new ideas. Feel free to hack, modify, or do whatever with the code. If you do something cool, or have any questions or suggestions, just post them in the comments.

Review: Living, working and using the Cisco Umi personal telepresence system. All that and bag of chips?


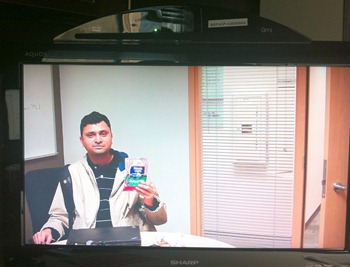
Cisco Umi Call 1The picture at right is of my Cisco Umi I have hooked up at my house in Portland, OR. My friend Vishal is in Seattle. Why is he holding a bag of chips? More on that later.

I noticed recently that I've now got a LOT of posts in my Remote Work category of my blog. Considering that I work for Microsoft in Seattle but from Portland and I have for three years now, I can say I'm officially a "Working Remotely Expert."

Important Point

There's some reviews out of the Cisco Umi (you-me) on the usual gadget blogs. They are lovely reviews by technical writers, to be clear. However, the folks that are writing these reviews don't need the product. They are smart technical product folks. However, I'm a practical pragmatist with a problem (alliteration not intended). I need to connect with my workplace without moving. Otherwise, I'll need to quit because I'm not moving. I need this product or one like it.

Let those reviewers argue about the marketplace. I'm using this thing every day and living it.

First, the background

I'm always looking for the next better way to work remotely, and let me tell you, it's not LiveMeeting or GotoMeeting. Being successful while working remotely is as much about the psychology of the situation as it is about the technology. Ultimately you have to realize that you're NOT there. Whether you're controlling a robot remotely and haunting the halls, or you've worked remotely for years as simply a voice on the conference line, you're not there.

Of course, as they say "out of sight, out of mind." The most important aspect of being remote is simply reminding folks that you exist. Sure, you can send emails and make sure you tell all the right people about what you're working on - and that's important - but there's something to be said for being present.

Many leadership and motivational speakers say "step 1 is showing up." I've written a number of posts on my experiments as a remote working attempting to show up.

Now, the Review

It's insane. Experiencing Full HD 1080p 30fps video of your friends and co-workers is the closest thing a Portal I can imagine. First, the clarity. Most video calls are 640x480. 480p is about a third of a mexapixel or 307,200 pixels and 1080p is 2,073,600 pixels. That's 6 times more pixels on the screen. That's the equivalent of thirty 2-megapixel camera photos a second. The distance between 480p and 1080p can't be accurately expressed when you use numbers like 480 and 1080. This clarity issue can't be overstated. Believe me. If you look, there's artifacting, sure, but no more than a Blu-Ray.

In fact, I'd say that a Cisco Umi call is basically a live streaming Blu-Ray of your family.

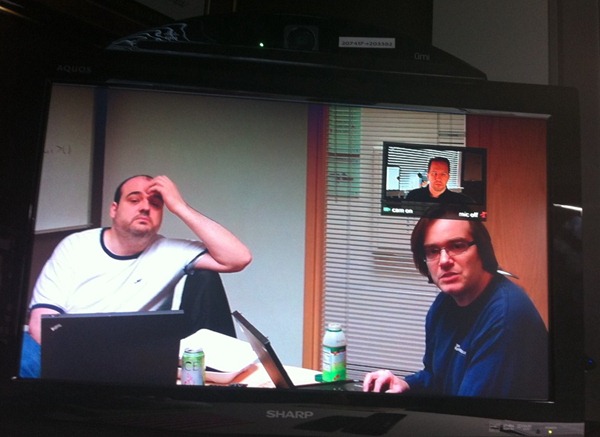
Cisco Umi Call 2

Next, smoothness of motion or frames per second. Not only is it basically 6 times clearer than your average video call, it's also has twice as many frames. It's smoothness also can't be overstated. This was the first thing that Damian Edwards noticed when we hooked it up in his living room. It's so smooth that you stop thinking about it the way you do in a webcam. You may not realize it but you expect webcams to look like crap. You expect them to drop frames and feel jerky. That's because life happens as a greater framerate than that. ;) The Umi does a great job of keeping up with the framerate.

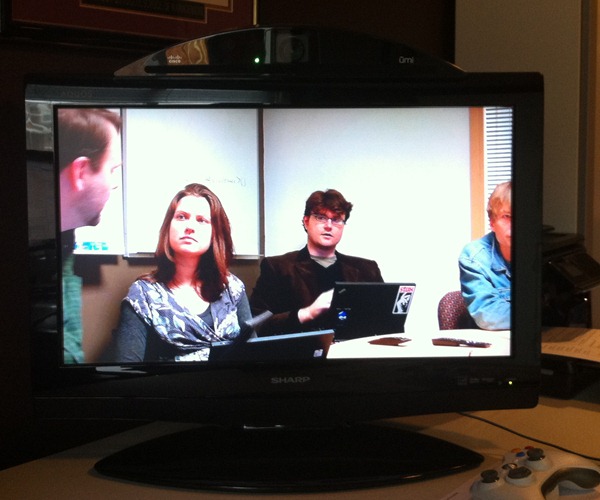
There's an HDMI pass-through on the Umi, which came as a welcome surprise to me as I have it in my home office. However, considering that this is a consumer (or pro-sumer) product that's meant for the living room, this is a smart move. You plug the Umi in as the last device before your TV. This means you can get calls when you're watching TV and the Umi "cloverleaf" interface will pop up and allow you to answer the call. For me, this meant I could keep my Xbox and Umi on the same HDMI input on my TV. If I'm playing Xbox I can still answer a Umi call.

photo

The Cisco Umi interface is spartan in look, speed and style. In fact, to call it spartan my be unfair to the Spartans. It's basic to a fault. It's dry and uninspired. Fortunately as soon as the call starts you don't look at it again. Oddly, while the video runs at a buttery smooth 30fps, the user interface for the Umi feels very 10fps, you know? It feels underpowered and pokey. However, this is a nit as you only see it doing setup, answering and adding contacts. Both the UI and the Cisco Umi website are surprising in their lack of polish, but this isn't a deal breaker. A designer (maybe from the Xbox or PS3 teams) and a nice visual refresh of the admin website would really make a huge difference in the overall fit and finish.

Current Version: Chips and Audio Issues

Why's my buddy holding up chips? Well, there's an audio issue in the current version of the Umi. In some rooms with some TVs (not all, as I've seen it work fine in other situations) the Umi is a little aggressive with the audio noise cancelling. In an attempt to prevent feedback, the Umi software "clips audio" when two people talk at once on different sides of the call. That means if I Vishal says something or crinkles his bag of chips suddenly he can't hear me talk. Like, literally the sound is cut off completely.

It works fine if we take turns, but life isn't that convenient. People interrupt and talk over each other. Am I being too harsh? No. When was the last time you had your conference speakerphone or Skype cut someone off or mute them? Never, because it doesn't happen. Skype is absolutely brilliant with this.

Fortunately I have it on good authority from some very cool and very responsive Cisco Umi support guys that the engineers know about this audio edge case and are on it. My Umi auto-updated itself the first time I plugged it in, and I'm hoping that one day in the next few months this problem will just be solved. I'll update this post when that happens.

It's unfortunate because the Cisco Umi is supposed to have this amazing array microphone that is smart about picking up sounds and from my (and my team's) perspective, it's no better than a speaker phone, and in most cases much worse.

For now, this audio issue - in my room, given my constraints of very free-flowing conversations - is so irritating that we call the Umi then mute the audio. Then I'll use another audio channel (OC, Speaker Phone, whatever) as the audio. This works near-perfectly, and as an individual in a home office allows me also to use headphones. It'd be nice if there was an hardware option to plug in a standard USB microphone/headset into the UMI.

Rude Q&A

Here's my answers to a few of your questions.

Q. What, Skype HD to good for you? Live Messenger? Oovoo? Office Communicator/Lync?

A. Skype is stingy about HD video. They have been for four years. Four. You used to be able to hack it (I know, because I did) but currently there appears to be a white-list of supported cameras, specifically Logitech ones. There's obviously some kind of deal going on where they don't want to allow it for anyone on any camera can has the ability. A few technical points first. Pushing HD video is hard. Cameras like the LifeCam and other HD webcams can't push 1080p 30fps through USB2. Also, there are both driver issues and hardware issues. You can use the default driver that includes some filtering, color stuff, and animated fish nonsense, or you can use a default driver that just pushes out MJPEG (Motion JPEG) as fast as possible, unfiltered. In order to get 720p 15fps (yes, 15) you'll need at LEAST a quad-core processor to squish the frames as well as at least 1.5Mbps of bandwidth. Also note that you're not actually sending or receiving HD until the receiver's video window has expended to a size that is near 1280x720p. (This is a clever optimization.)

That was a lot of info. Here's the bullets:

  • HD Video takes a LOT of CPU
  • HD Video from today's USB cameras has a limited framerate when paired with today's software. We need more cameras with hardware acceleration or the ability for my video card to help out
  • Believe it or not, 720p at 15fps isn't that great given the inexpensive sensors in today's cameras (and I've tried them all.) Once you've done a video call at 1080p at 30fps, it's hard to imagine anything else others than MOAR PIXELS!!!

Fancy chart showing that 1080p is a crapload of pixels when compared to anything else

Q. Isn't $600 per Umi expensive?

A. Sure. And so is a ticket. Or mileage, or a hotel. It's effectively $1000 for me to drive to Seattle, stay a few days, eat, submit a standard mileage expense and drive back. This whole system is about the same as one trip, except I use it daily.

I've said before, spend money and don't feel bad about it when it's something you use every day. Computer, Monitor, Bed, Chair, Car, Food. But the best quality in all these things. The Umi was a bargain. If I had relatives with decent bandwidth who lived more than 4 hours away I'd spend the money in a heartbeat so they could see my kids.

That said, there's a "Buy One Get One Free" Cisco Umi sale going on right now at BestBuy and Magnolia. So that's $600 all up for two, plus the fees. If your parents are far away and have 3 to 4Mbps of bandwidth to spare, that's a hell of a deal. This is over the 13th. Note, this is NOT an affiliate link and I don't get any money for any of this. I'm not attached to Cisco at all.

Q. What about the $25 per side monthly fee?

Ya, that is lame. It's the Umi tax. They have a cloud with support for visual voice mail, routing video calls to Google Chat, email notification, etc. I think $50 a year would be more reasonable.

Conclusion

You know those multi-thousand dollar telepresence rooms that you wish you had at your company? Well, I've got a tiny one and I'm 90% happy with it. I'm looking forward to the sound fixes. More as it comes!

Crazy Telepresence Room

Hope this was helpful. If you have an Umi, call me sometime at 207417.


© 2011 Scott Hanselman. All rights reserved.