Minggu, 23 Januari 2011

ASP.NET MVC 3: Razor’s @: and syntax


This is another in a series of posts I’m doing that cover some of the new ASP.NET MVC 3 features:

In today’s post I’m going to discuss two useful syntactical features of the new Razor view-engine – the @: and <text> syntax support.

Fluid Coding with Razor

ASP.NET MVC 3 ships with a new view-engine option called “Razor” (in addition to the existing .aspx view engine). You can learn more about Razor, why we are introducing it, and the syntax it supports from my Introducing Razor blog post.

Razor minimizes the number of characters and keystrokes required when writing a view template, and enables a fast, fluid coding workflow. Unlike most template syntaxes, you do not need to interrupt your coding to explicitly denote the start and end of server blocks within your HTML. The Razor parser is smart enough to infer this from your code. This enables a compact and expressive syntax which is clean, fast and fun to type.

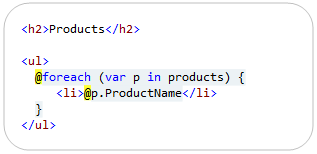
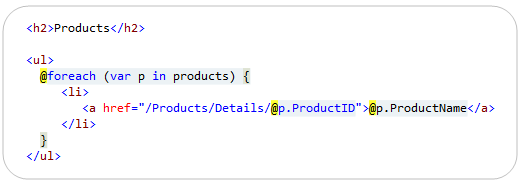
For example, the Razor snippet below can be used to iterate a list of products:

image

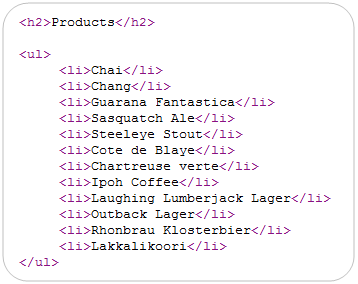
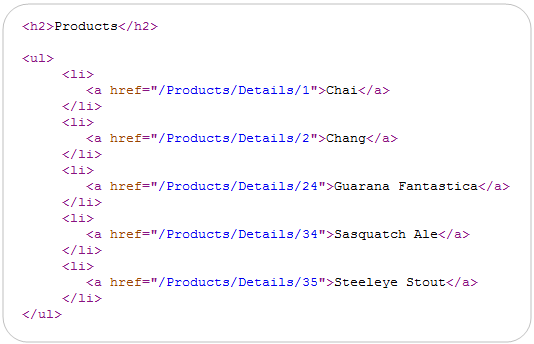
When run, it generates output like:

image

One of the techniques that Razor uses to implicitly identify when a code block ends is to look for tag/element content to denote the beginning of a content region. For example, in the code snippet above Razor automatically treated the inner <li></li> block within our foreach loop as an HTML content block because it saw the opening <li> tag sequence and knew that it couldn’t be valid C#.

This particular technique – using tags to identify content blocks within code – is one of the key ingredients that makes Razor so clean and productive with scenarios involving HTML creation.

Using @: to explicitly indicate the start of content

Not all content container blocks start with a tag element tag, though, and there are scenarios where the Razor parser can’t implicitly detect a content block.

Razor addresses this by enabling you to explicitly indicate the beginning of a line of content by using the @: character sequence within a code block. The @: sequence indicates that the line of content that follows should be treated as a content block:

image

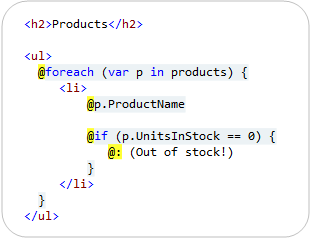
As a more practical example, the below snippet demonstrates how we could output a “(Out of Stock!)” message next to our product name if the product is out of stock:

image

Because I am not wrapping the (Out of Stock!) message in an HTML tag element, Razor can’t implicitly determine that the content within the @if block is the start of a content block. We are using the @: character sequence to explicitly indicate that this line within our code block should be treated as content.

Using Code Nuggets within @: content blocks

In addition to outputting static content, you can also have code nuggets embedded within a content block that is initiated using a @: character sequence.

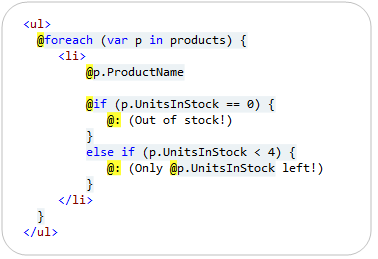
For example, we have two @: sequences in the code snippet below:

image

Notice how within the second @: sequence we are emitting the number of units left within the content block (e.g. - “(Only 3 left!”). We are doing this by embedding a @p.UnitsInStock code nugget within the line of content.

Multiple Lines of Content

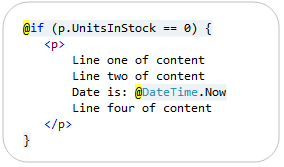
Razor makes it easy to have multiple lines of content wrapped in an HTML element. For example, below the inner content of our @if container is wrapped in an HTML <p> element – which will cause Razor to treat it as content:

image

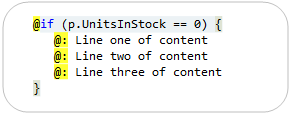
For scenarios where the multiple lines of content are not wrapped by an outer HTML element, you can use multiple @: sequences:

image

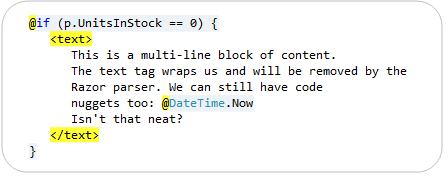
Alternatively, Razor also allows you to use a <text> element to explicitly identify content:

image

The <text> tag is an element that is treated specially by Razor. It causes Razor to interpret the inner contents of the <text> block as content, and to not render the containing <text> tag element (meaning only the inner contents of the <text> element will be rendered – the tag itself will not). This makes it convenient when you want to render multi-line content blocks that are not wrapped by an HTML element.

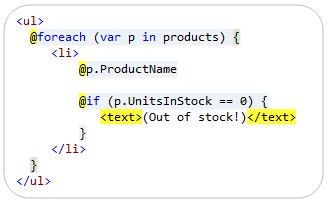
The <text> element can also optionally be used to denote single-lines of content, if you prefer it to the more concise @: sequence:

image

The above code will render the same output as the @: version we looked at earlier. Razor will automatically omit the <text> wrapping element from the output and just render the content within it.

Summary

Razor enables a clean and concise templating syntax that enables a very fluid coding workflow. Razor’s smart detection of <tag> elements to identify the beginning of content regions is one of the reasons that the Razor approach works so well with HTML generation scenarios, and it enables you to avoid having to explicitly mark the beginning/ending of content regions in about 95% of if/else and foreach scenarios.

Razor’s @: and <text> syntax can then be used for scenarios where you want to avoid using an HTML element within a code container block, and need to more explicitly denote a content region.

Hope this helps,

Scott

P.S. In addition to blogging, I am also now using Twitter for quick updates and to share links. Follow me at: twitter.com/scottgu

ASP.NET MVC 3: Implicit and Explicit code nuggets with Razor


This is another in a series of posts I’m doing that cover some of the new ASP.NET MVC 3 features:

In today’s post I’m going to discuss how Razor enables you to both implicitly and explicitly define code nuggets within your view templates, and walkthrough some code examples of each of them.

Fluid Coding with Razor

ASP.NET MVC 3 ships with a new view-engine option called “Razor” (in addition to the existing .aspx view engine). You can learn more about Razor, why we are introducing it, and the syntax it supports from my Introducing Razor blog post.

Razor minimizes the number of characters and keystrokes required when writing a view template, and enables a fast, fluid coding workflow. Unlike most template syntaxes, you do not need to interrupt your coding to explicitly denote the start and end of server blocks within your HTML. The Razor parser is smart enough to infer this from your code. This enables a compact and expressive syntax which is clean, fast and fun to type.

For example, the Razor snippet below can be used to iterate a collection of products and output a <ul> list of product names that link to their corresponding product pages:

image

When run, the above code generates output like below:

image

Notice above how we were able to embed two code nuggets within the content of the foreach loop. One of them outputs the name of the Product, and the other embeds the ProductID within a hyperlink. Notice that we didn’t have to explicitly wrap these code-nuggets - Razor was instead smart enough to implicitly identify where the code began and ended in both of these situations.

How Razor Enables Implicit Code Nuggets

Razor does not define its own language. Instead, the code you write within Razor code nuggets is standard C# or VB. This allows you to re-use your existing language skills, and avoid having to learn a customized language grammar.

The Razor parser has smarts built into it so that whenever possible you do not need to explicitly mark the end of C#/VB code nuggets you write. This makes coding more fluid and productive, and enables a nice, clean, concise template syntax. Below are a few scenarios that Razor supports where you can avoid having to explicitly mark the beginning/end of a code nugget, and instead have Razor implicitly identify the code nugget scope for you:

Property Access

Razor allows you to output a variable value, or a sub-property on a variable that is referenced via “dot” notation:

image

You can also use “dot” notation to access sub-properties multiple levels deep:

image

Array/Collection Indexing:

Razor allows you to index into collections or arrays:

image

Calling Methods:

Razor also allows you to invoke methods:

image

Notice how for all of the scenarios above how we did not have to explicitly end the code nugget. Razor was able to implicitly identify the end of the code block for us.

Razor’s Parsing Algorithm for Code Nuggets

The below algorithm captures the core parsing logic we use to support “@” expressions within Razor, and to enable the implicit code nugget scenarios above:

  1. Parse an identifier - As soon as we see a character that isn't valid in a C# or VB identifier, we stop and move to step 2
  2. Check for brackets - If we see "(" or "[", go to step 2.1., otherwise, go to step 3
    1. Parse until the matching ")" or "]" (we track nested "()" and "[]" pairs and ignore "()[]" we see in strings or comments)
    2. Go back to step 2
  3. Check for a "." - If we see one, go to step 3.1, otherwise, DO NOT ACCEPT THE "." as code, and go to step 4
    1. If the character AFTER the "." is a valid identifier, accept the "." and go back to step 1, otherwise, go to step 4
  4. Done!

Differentiating between code and content

Step 3.1 is a particularly interesting part of the above algorithm, and enables Razor to differentiate between scenarios where an identifier is being used as part of the code statement, and when it should instead be treated as static content:

image

Notice how in the snippet above we have ? and ! characters at the end of our code nuggets. These are both legal C# identifiers – but Razor is able to implicitly identify that they should be treated as static string content as opposed to being part of the code expression because there is whitespace after them. This is pretty cool and saves us keystrokes.

Explicit Code Nuggets in Razor

Razor is smart enough to implicitly identify a lot of code nugget scenarios. But there are still times when you want/need to be more explicit in how you scope the code nugget expression. The @(expression) syntax allows you to do this:

image

You can write any C#/VB code statement you want within the @() syntax. Razor will treat the wrapping () characters as the explicit scope of the code nugget statement. Below are a few scenarios where we could use the explicit code nugget feature:

Perform Arithmetic Calculation/Modification:

You can perform arithmetic calculations within an explicit code nugget:

image

Appending Text to a Code Expression Result:

You can use the explicit expression syntax to append static text at the end of a code nugget without having to worry about it being incorrectly parsed as code:

image

Above we have embedded a code nugget within an <img> element’s src attribute. It allows us to link to images with URLs like “/Images/Beverages.jpg”. Without the explicit parenthesis, Razor would have looked for a “.jpg” property on the CategoryName (and raised an error). By being explicit we can clearly denote where the code ends and the text begins.

Using Generics and Lambdas

Explicit expressions also allow us to use generic types and generic methods within code expressions – and enable us to avoid the <> characters in generics from being ambiguous with tag elements.

One More Thing….Intellisense within Attributes

We have used code nuggets within HTML attributes in several of the examples above. One nice feature supported by the Razor code editor within Visual Studio is the ability to still get VB/C# intellisense when doing this.

Below is an example of C# code intellisense when using an implicit code nugget within an <a> href=”” attribute:

image

Below is an example of C# code intellisense when using an explicit code nugget embedded in the middle of a <img> src=”” attribute:

image

Notice how we are getting full code intellisense for both scenarios – despite the fact that the code expression is embedded within an HTML attribute (something the existing .aspx code editor doesn’t support). This makes writing code even easier, and ensures that you can take advantage of intellisense everywhere.

Summary

Razor enables a clean and concise templating syntax that enables a very fluid coding workflow. Razor’s ability to implicitly scope code nuggets reduces the amount of typing you need to perform, and leaves you with really clean code.

When necessary, you can also explicitly scope code expressions using a @(expression) syntax to provide greater clarity around your intent, as well as to disambiguate code statements from static markup.

Hope this helps,

Scott

P.S. In addition to blogging, I am also now using Twitter for quick updates and to share links. Follow me at: twitter.com/scottgu

ASP.NET MVC 3 Extensionless URLs on IIS 6


A lot has been written about how to get ASP.NET MVC running on IIS 6 with extensionless URLs. Up until now, the story hasn’t been very pretty. When running ASP.NET MVC on ASP.NET 4, it gets a lot easier.

To be fair, the part that makes it easier has nothing to do with ASP.NET MVC 3 and everything to do with a little known new feature of ASP.NET 4 creatively called the ASP.NET 4 Extensionless URL feature. ASP.NET MVC 3 requires ASP.NET 4 so it naturally benefits from this new feature.

If you have a server running IIS 6, ASP.NET 4, and ASP.NET MVC 3 (or even ASP.NET MVC 2. I haven’t tried ASP.NET MVC 1.0), your website should just work with the default extensionless URLs generated by ASP.NET MVC applications. No need to configure wildcard mappings nor *.mvc mappings. In fact, you don’t even need to set RAMMFAR to true. RAMMFAR is our pet name for the runAllManagedModulesForAllRequests setting within the system.webserver setting in web.config. You can feel free to set this to false.

<modules runAllManagedModulesForAllRequests='false'/>


When installing ASP.NET 4, this is enabled by default. So if you have a hosting provider still using IIS 6, but does have ASP.NET 4 installed, then this should work for you, unless…


How does this work?


To be honest, it’s a bit of voodoo magic as far as I can tell and there’s a lot of caveats when it comes to using this feature with IIS 6. There are edge cases where it can cause problems. This is why Thomas Marquardt, the implementor of the feature, wrote a blog post on how to disable ASP.NET 4.0 Extensionless URLs just in case.


In that blog post, he describes the bit of magic that makes this work.


Here’s how the v4.0 ASP.NET extensionless URL features works on IIS 6. We have an ISAPI Filter named aspnet_filter.dll that appends “/eurl.axd/GUID” to extensionless URLs. This happens early on in the request processing. We also have a script mapping so that “*.axd” requests are handled by our ISAPI, aspnet_isapi.dll. When we append “/eurl.axd/GUID” to extensionless URLs, it causes them to be mapped to our aspnet_isapi.dll, as long as the script map exists as expected. These requests then enter ASP.NET where we remove “/eurl.axd/GUID” from the URL, that is, we restore the original URL. The restoration of the original URL happens very early. Now the URL is extensionless again, and if no further changes are made


He also has a list of conditions that must be true for this feature to work. If any one of them is false, then you’re back to the old extensionfull URLs with IIS 6.


I’m Getting a 403 Forbidden


This is not technically related, but when I tried to test this out to confirm the behavior, I ran into a case where every request was giving me a 403 Forbidden error message. Here’s how I fixed it.


In IIS Manager, I right clicked on the Web Services Extension node and selected the menu option labeled Allow all Web Service extensions for a specific application:


iis6-allowing-extensions


In the resulting dialog, I chose the ASP.NET v4.0.30319 option.


iis6-allow-web-service


To double check that everything was configured correctly, I looked at the properties for my website and ensured that Scripts were enabled.


iis6-home-directory-tab


I also clicked on the Configuration… button and made sure that *.axd was mapped to the proper ASP.NET Isapi dll (aspnet_isapi.dll).


iis6-isapi


iis6-extension-mapping


With all that in place, I was able to run standard ASP.NET MVC web application and make requests for /, /home/about/, etc. without any problems!


ASP.NET MVC 3: Layouts and Sections with Razor


This is another in a series of posts I’m doing that cover some of the new ASP.NET MVC 3 features:

In today’s post I’m going to go into more details about how Layout pages work with Razor. In particular, I’m going to cover how you can have multiple, non-contiguous, replaceable “sections” within a layout file – and enable views based on layouts to optionally “fill in” these different sections at runtime. The Razor syntax for doing this is clean and concise.

I’ll also show how you can dynamically check at runtime whether a particular layout section has been defined, and how you can provide alternate content (or even an alternate layout) in the event that a section isn’t specified within a view template. This provides a powerful and easy way to customize the UI of your site and make it clean and DRY from an implementation perspective.

What are Layouts?

You typically want to maintain a consistent look and feel across all of the pages within your web-site/application. ASP.NET 2.0 introduced the concept of “master pages” which helps enable this when using .aspx based pages or templates. Razor also supports this concept with a feature called “layouts” – which allow you to define a common site template, and then inherit its look and feel across all the views/pages on your site.

I previously discussed the basics of how layout files work with Razor in my ASP.NET MVC 3: Layouts with Razor blog post. Today’s post will go deeper and discuss how you can define multiple, non-contiguous, replaceable regions within a layout file that you can then optionally “fill in” at runtime.

Site Layout Scenario

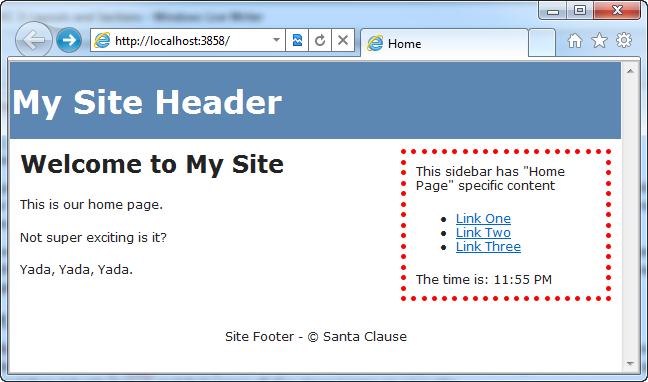
Let’s look at how we can implement a common site layout scenario with ASP.NET MVC 3 and Razor. Specifically, we’ll implement some site UI where we have a common header and footer on all of our pages. We’ll also add a “sidebar” section to the right of our common site layout.

On some pages we’ll customize the SideBar to contain content specific to the page it is included on:
image

And on other pages (that do not have custom sidebar content) we will fall back and provide some “default content” to the sidebar:

image

We’ll use ASP.NET MVC 3 and Razor to enable this customization in a nice, clean way.

Below are some step-by-step tutorial instructions on how to build the above site with ASP.NET MVC 3 and Razor.

Part 1: Create a New Project with a Layout for the “Body” section

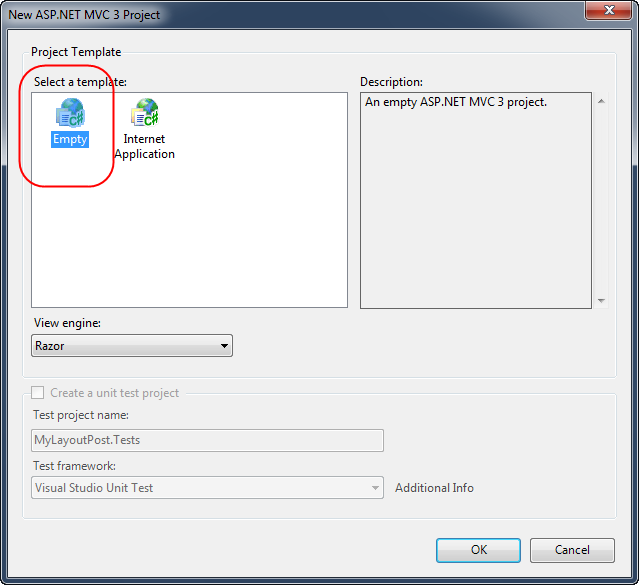
We’ll begin by using the “File->New Project” menu command within Visual Studio to create a new ASP.NET MVC 3 Project. We’ll create the new project using the “Empty” template option:
image

This will create a new project that has no default controllers in it:

image

Creating a HomeController

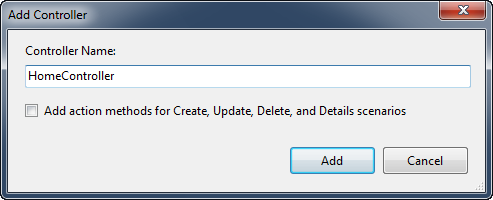
We will then right-click on the “Controllers” folder of our newly created project and choose the “Add->Controller” context menu command. This will bring up the “Add Controller” dialog:
image

We’ll name the new controller we create “HomeController”. When we click the “Add” button Visual Studio will add a HomeController class to our project with a default “Index” action method that returns a view:

image

We won’t need to write any Controller logic to implement this sample – so we’ll leave the default code as-is.

Creating a View Template

Our next step will be to implement the view template associated with the HomeController’s Index action method. To implement the view template, we will right-click within the “HomeController.Index()” method and select the “Add View” command to create a view template for our home page:

image

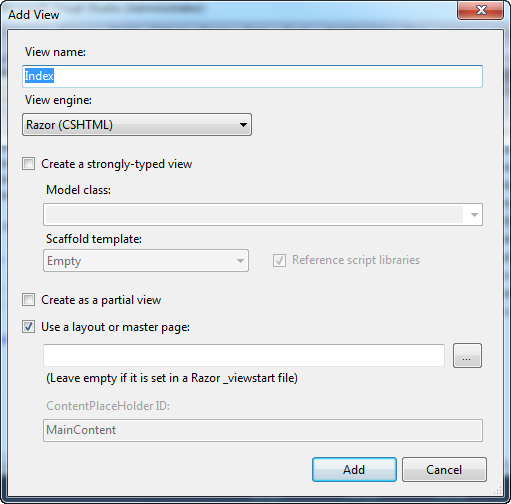
This will bring up the “Add View” dialog within Visual Studio.
image

We do not need to change any of the default settings within the above dialog (the name of the template was auto-populated to Index because we invoked the “Add View” context menu command within the Index method).

When we click the “Add” Button within the dialog, a Razor-based “Index.cshtml” view template will be added to the \Views\Home\ folder within our project. Let’s add some simple default static content to it:

image

Notice above how we don’t have an <html> or <body> section defined within our view template. This is because we are going to rely on a layout template to supply these elements and use it to define the common site layout and structure for our site (ensuring that it is consistent across all pages and URLs within the site).

Customizing our Layout File

Let’s open and customize the default “_Layout.cshtml” file that was automatically added to the \Views\Shared folder when we created our new project:

image

The default layout file (shown above) is pretty basic and simply outputs a title (if specified in either the Controller or the View template) and adds links to a stylesheet and jQuery. The call to “RenderBody()” indicates where the main body content of our Index.cshtml file will merged into the output sent back to the browser.

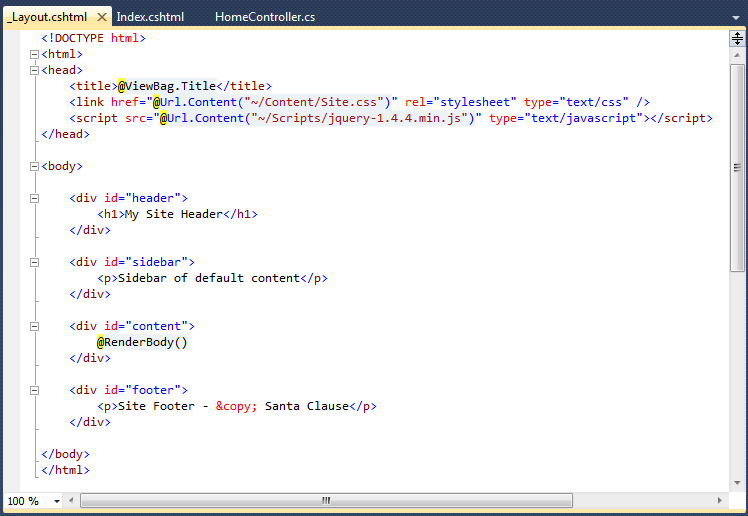
Let’s modify the Layout template to add a common header, footer and sidebar to the site:
image

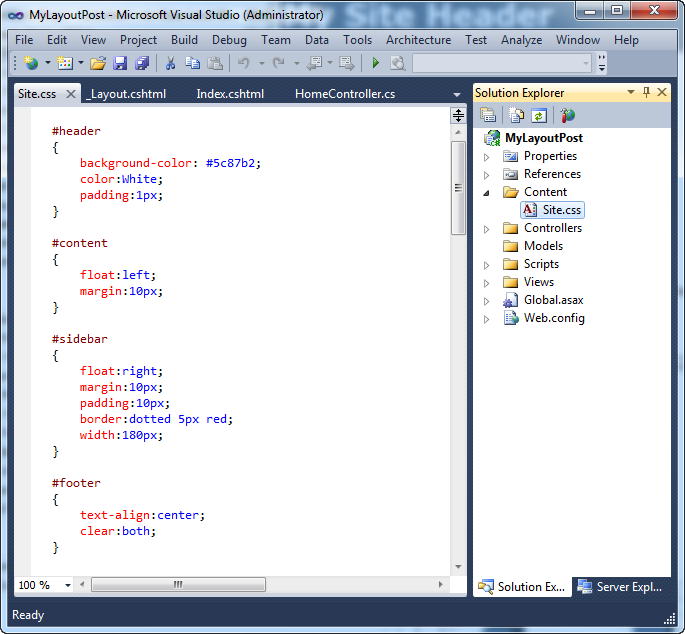
We’ll then edit the “Site.css” file within the \Content folder of our project and add 4 CSS rules to it:
image

And now when we run the project and browse to the home “/” URL of our project we’ll see a page like below:

image

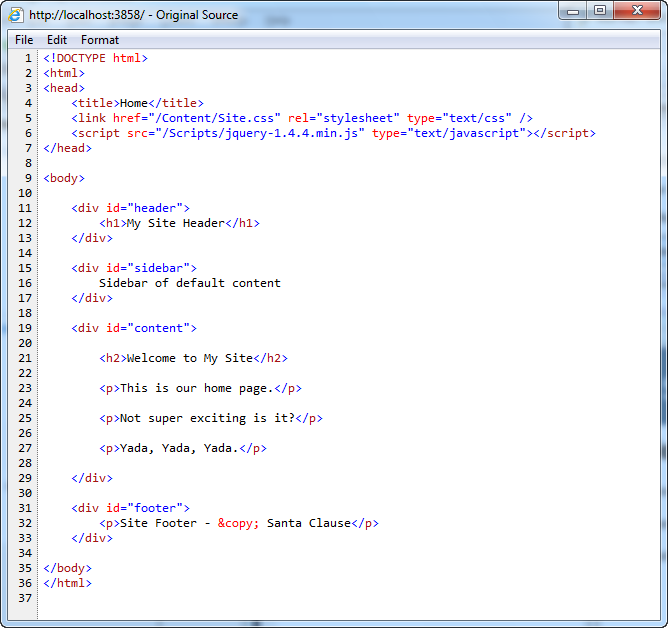
Notice how the content of the HomeController’s Index view template and the site’s Shared Layout template have been merged together into a single HTML response.

Below is what the HTML sent back from the server looks like:
image

Part 2: Adding a “SideBar” Section

Our site so far has a layout template that has only one “section” in it – what we call the main “body” section of the response.

Razor also supports the ability to add additional "named sections” to layout templates as well. These sections can be defined anywhere in the layout file (including within the <head> section of the HTML), and allow you to output dynamic content to multiple, non-contiguous, regions of the final response.

Defining the “SideBar” section in our Layout

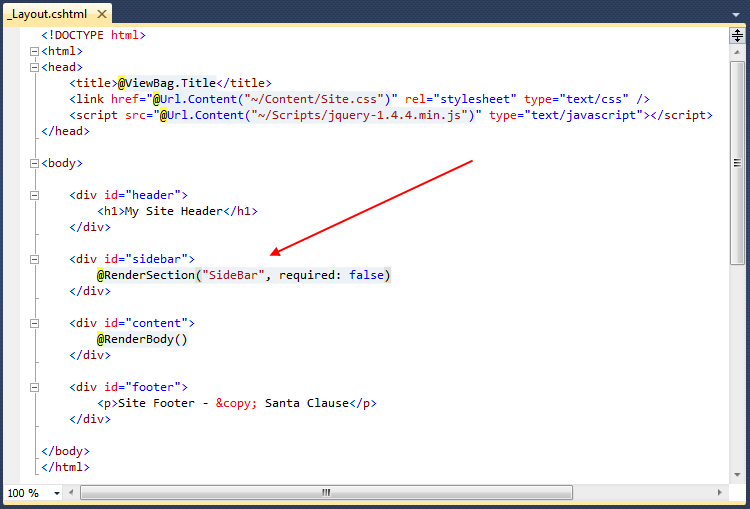
Let’s update our Layout template to define an additional “SideBar” section of content that will be rendered within the <div id=”sidebar”> region of our HTML. We can do this by calling the RenderSection(string sectionName, bool required) helper method within our Layout.cshtml file like below:
image

The first parameter to the “RenderSection()” helper method specifies the name of the section we want to render at that location in the layout template. The second parameter is optional, and allows us to define whether the section we are rendering is required or not. If a section is “required”, then Razor will throw an error at runtime if that section is not implemented within a view template that is based on the layout file (which can make it easier to track down content errors). If a section is not required, then its presence within a view template is optional, and the above RenderSection() code will render nothing at runtime if it isn’t defined.

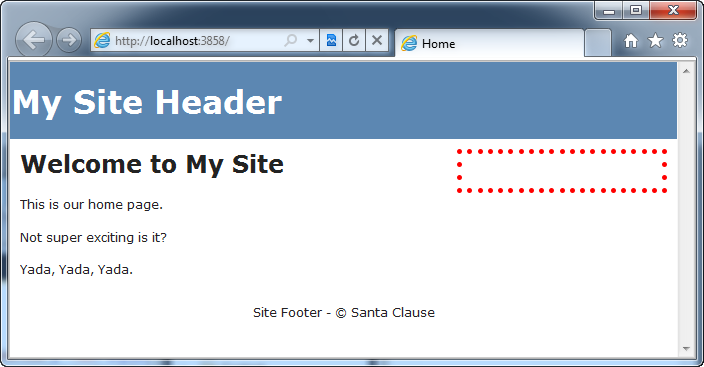
Now that we’ve made the above change to our layout file, let’s hit refresh in our browser and see what our Home page now looks like:
image

Notice how we currently have no content within our SideBar <div> – that is because the Index.cshtml view template doesn’t implement our new “SideBar” section yet.

Implementing the “SideBar” Section in our View Template

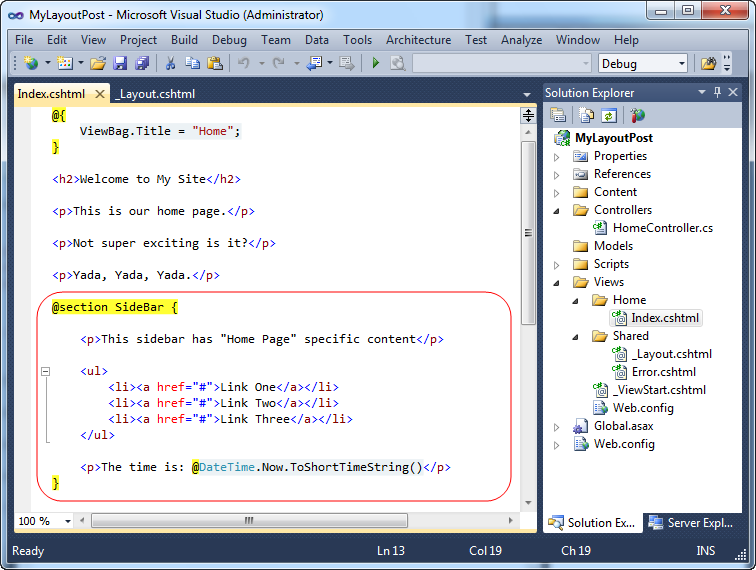
Let’s change our home-page so that it has a SideBar section that outputs some custom content. We can do that by opening up the Index.cshtml view template, and by adding a new “SiderBar” section to it. We’ll do this using Razor’s @section SectionName { } syntax:
image

We could have put our SideBar @section declaration anywhere within the view template. I think it looks cleaner when defined at the top or bottom of the file – but that is simply personal preference.

You can include any content or code you want within @section declarations. Notice above how I have a C# code nugget that outputs the current time at the bottom of the SideBar section. I could have also written code that used ASP.NET MVC’s HTML/AJAX helper methods and/or accessed any strongly-typed model objects passed to the Index.cshtml view template.

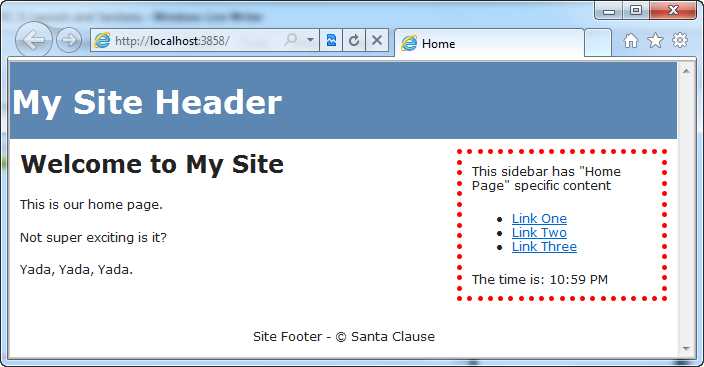
Now that we’ve made the above template changes, when we hit refresh in our browser again we’ll see that our SideBar content – that is specific to the Home Page of our site – is now included in the page response sent back from the server:
image

The SideBar section content has been merged into the proper location of the HTML response :

image

Part 3: Conditionally Detecting if a Layout Section Has Been Implemented

Razor provides the ability for you to conditionally check (from within a layout file) whether a section has been defined within a view template, and enables you to output an alternative response in the event that the section has not been defined. This provides a convenient way to specify default UI for optional layout sections.

Let’s modify our Layout file to take advantage of this capability. Below we are conditionally checking whether the “SideBar” section has been defined without the view template being rendered (using the IsSectionDefined() method), and if so we render the section. If the section has not been defined, then we now instead render some default content for the SideBar:

image

Note: You want to make sure you prefix calls to the RenderSection() helper method with a @ character – which will tell Razor to execute the HelperResult it returns and merge in the section content in the appropriate place of the output. Notice how we wrote @RenderSection(“SideBar”) above instead of just RenderSection(“SideBar”). Otherwise you’ll get an error.

Above we are simply rendering an inline static string (<p>Default SideBar Content</p>) if the section is not defined. A real-world site would more likely refactor this default content to be stored within a separate partial template (which we’d render using the Html.RenderPartial() helper method within the else block) or alternatively use the Html.Action() helper method within the else block to encapsulate both the logic and rendering of the default sidebar.

When we hit refresh on our home-page, we will still see the same custom SideBar content we had before. This is because we implemented the SideBar section within our Index.cshtml view template (and so our Layout rendered it):

image

Let’s now implement a “/Home/About” URL for our site by adding a new “About” action method to our HomeController:

image

The About() action method above simply renders a view back to the client when invoked. We can implement the corresponding view template for this action by right-clicking within the “About()” method and using the “Add View” menu command (like before) to create a new About.cshtml view template.

We’ll implement the About.cshtml view template like below. Notice that we are not defining a “SideBar” section within it:

image

When we browse the /Home/About URL we’ll see the content we supplied above in the main body section of our response, and the default SideBar content will rendered:

image

The layout file determined at runtime that a custom SideBar section wasn’t present in the About.cshtml view template, and instead rendered the default sidebar content.

One Last Tweak…

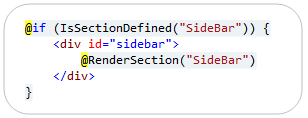
Let’s suppose that at a later point we decide that instead of rendering default side-bar content, we just want to hide the side-bar entirely from pages that don’t have any custom sidebar content defined. We could implement this change simply by making a small modification to our layout so that the sidebar content (and its surrounding HTML chrome) is only rendered if the SideBar section is defined. The code to do this is below:
image

Razor is flexible enough so that we can make changes like this and not have to modify any of our view templates (nor make change any Controller logic changes) to accommodate this. We can instead make just this one modification to our Layout file and the rest happens cleanly. This type of flexibility makes Razor incredibly powerful and productive.

Summary

Razor’s layout capability enables you to define a common site template, and then inherit its look and feel across all the views/pages on your site.

Razor enables you to define multiple, non-contiguous, “sections” within layout templates that can be “filled-in” by view templates. The @section {} syntax for doing this is clean and concise. Razor also supports the ability to dynamically check at runtime whether a particular section has been defined, and to provide alternate content (or even an alternate layout) in the event that it isn’t specified. This provides a powerful and easy way to customize the UI of your site - and make it clean and DRY from an implementation perspective.

Hope this helps,

Scott

P.S. In addition to blogging, I am also now using Twitter for quick updates and to share links. Follow me at: twitter.com/scottgu